These instructions were prepared for students at Graceland University who have accounts on brutus.graceland.edu. It provides an illustrated screenshot tutorial that accomplishes the following steps:
The screenshots were done on a machine running Windows 2000 using the Paint (v5.0) and Internet Explorer (v5.5) applications. However, the principles are the same even if your situation differs (e.g., on a Macintosh with Netscape and some other paint application). Descriptive comments that accompany the screenshots should be helpful.
The following steps illustrate use of the Paint application on Windows. Launch it from the Windows Start menu at Start->Programs->Accessories->Paint. You can use a different paint or draw application, but you want to be able to save it as either a gif or a jpg (or jpeg) file. You can usually determine this by starting the program, selecting the Save As option under the File menu, and verifying that one of the filetype choices includes either of these filetypes. When you have a choice save graphics as GIF files and images as JPG files (but either filetype will work).
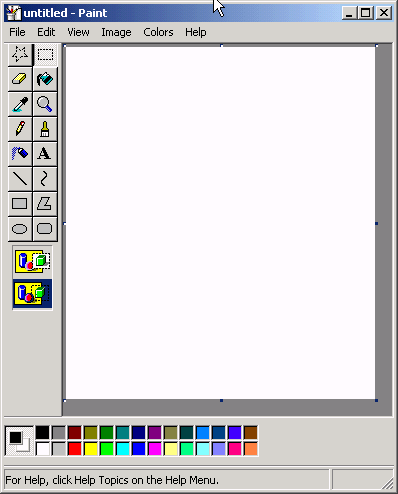
Once you launch the Paint program you will see a blank
canvas that you can draw on.

Use the painting tools and menu options (e.g., copy and paste)
to create your graphic image. To change the width or color of
lines and perimeters arounds objects, first choose the Line tool
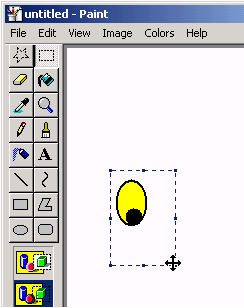
to make that change. In this example, the line width was
enlarged, an oval was drawn and filled with yellow paint,
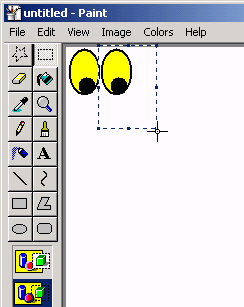
a solid black circle was drawn and moved into place. Then
several copy, paste, and drag operations were performed to
finish the eyes. More precise instructions on how to use the
Paint program and tools are not described here, but you can
learm more by using the Help menu and by experimenting.
|
|
|
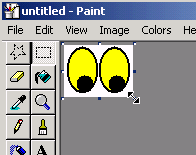
When finished creating your graphic image, select and drag it to the upper-left corner of the canvas (if not already there). Than drag the lower-right canvas handle to resize the entire image to minimize any padding around the edge that you do not want to see in a webpage. |
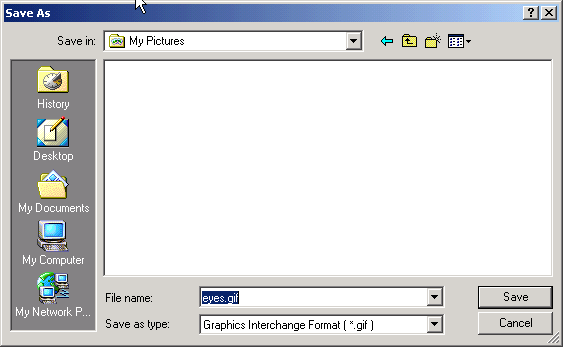
From the Edit menu select Save as. Change the file
type to Graphics Interchange Format, enter the File name,
and Save in a folder that you can easily find later on.
As shown here you should explicitly enter the filename extention
(.gif) rather than let it be done for you. This will
avoid problems later when the file exists on Unix (e.g., brutus)
and you must remember and use the exact filename and extension.
Casing matters on Unix, so it is a good idea to stick with an
easy to remember convention and the typical one is to lowercase
everything, thus GIF filenames would end with .gif,
not .GIF.
GIF files have a special property (unlike JPEG or BMP files) that allows you to specify a transparent background. That is what we want to do in this step, set a transparent color for your GIF file graphic.
A problem you may have in doing this step is that your
version of Paint may lack the feature needed (unlike the
one shown in these screen shots).
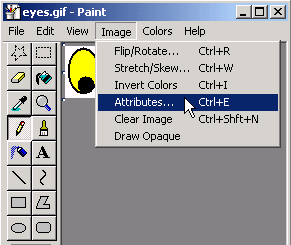
Select the Attributes option from the Image menu
and see if there is a Transparency section in the dialog box.
If not then go to the supplementary instructions
on how to do this using Microsoft Photo Editor.
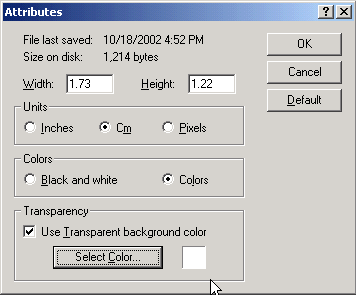
Otherwise, check the box for transparent background and select
which color is to be transparent when viewed in a webpage
(that is, causing the webpage's background to be seen).
In the example below we selected WHITE as the background color.
Press the OK button and Save the file once again.
|
|
Using a telnet client on your PC, logon to brutus and
navigate to your web directory (i.e., public_html). If you have
not yet created a special subdirectory for images
you may want to do so. You must give this subdirectory the
"755" permission settings that all of your web accessible
subdirectories should have, using the chmod Unix
command.

The Internet mechanism for transfering files is called File Transfer Protocol (FTP). When used as a verb, FTP means to transfer files. You can FTP from anywhere, not just on-campus. To FTP a file from site A to site B puts a copy of the file that exists at site A on to site B, perhaps replacing one having the same name. In this illustration, the eyes.gif file is FTPed from the PC, where it was created and saved, to John Doe's webspace on brutus. An FTP server program is running on brutus and you will run an FTP client program on the PC to make the transfer. There are a variety of FTP client programs that you can purchase or get for free, some easier to use than others. However, a web browser is like a "Swiss army knife" of different blades or tools, and an FTP client is one of them. The following steps illustrate how to use your Internet Explorer web browser in order to FTP the eyes.gif file from your PC to brutus.
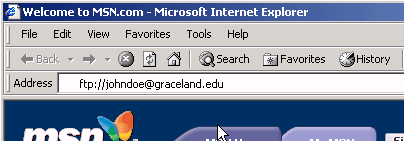
| After you start your web browser you will enter into the Address field (the Location field in some browsers) an address that begins with ftp:// followed by username@servername (e.g., johndoe@brutus.graceland.edu). |
|
| At this point you should be asked for the UserID and Password Login information. You are not trying to connect to brutus in an anonymous fashion, but rather you are logging in to your own brutus account. Thus, you DO NOT check the box to Login Anonymously. |
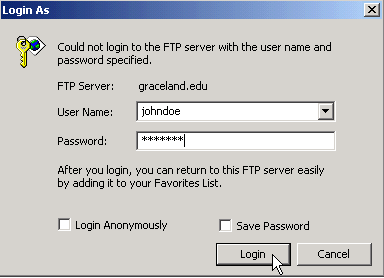
|
| The browser should display a list of files and folders in your home directory on brutus. One of these is your public_html subdirectory (this tutorial assumes you previously had created such a directory and gave it "755" permissions). That is the directory that will be considered to be the top-level directory for your website. Double-click on it. |
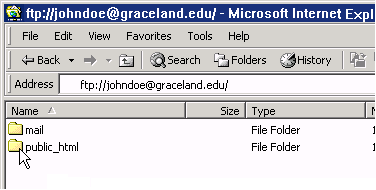
|
| The browser should display a list of files and folders in public_html, where you will see your images subdirectory (created in an earlier step). Double-click on it. |
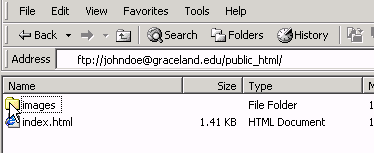
|
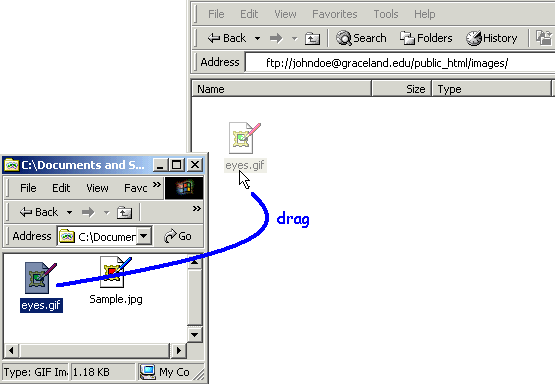
The browser should display the contents of your images
subdirectory. In a separate window, open up the folder on your
PC that contains the eyes.gif file and drag its icon
over to the web browser window that represents the
contents of your images subdirectory on brutus.
An FTP transfer should take place and an icon of the copied file
should show up in your web browser window.
Return to the telnet window to issue the Unix commands that
(1) navigate down into your images directory
(e.g., public_html/images), and
(2) use the chmod command to set the permissions to 644 for the gif file.

Typically, you use a relative path name reference to your own
webpage image files. Such a reference is relative to the location of
the html file that references the image file. Thus,
if the image file is in the same directory as the html file, simply
use the name of the file. In our example here we are using
John Doe's home page (index.html) that is in his
public_html directory and the eyes.gif file is
one level down, inside of the images subdirectory. Thus,
the relative path name of images/eyes.gif is what is used
in the img tag's src attribute, as shown here.


|
Now you should be able to point your browser at the webpage. In this case, we are pointing it at John Doe's homepage (the index.html file shown in the previous step). |
|
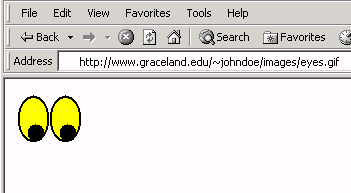
You can also point your browser directly at the image file itself as shown here. If you can view the image directly but not inside of a webpage (as above), then you know that the permissions are correct so the problem is that the reference inside of your webpage is where the error is. |
If you get a permissions denied error then the permissions are incorrect for either the image file (e.g., eyes.gif and the html file) or any of the containing subdirectories for your webspace (e.g., public_html, images). Go back and check those settings to make sure they are correct. For directories you want to see rwxr-xr-x (which is 755 in the chmod command) and for all image and html files you want to see rw-r--r-- (which is 644 in the chmod command). Don't forget to refresh each webpage you go back to if you have made any change to it (such as a permissions change).
If your webpage was not found or your images appear as simple placeholder icons for broken images, then you should explore what you have for filenames and directories on your brutus account using the cd and ls command. First you must see if they actually exist, are in the correct place, and that you are referencing by the exact names for them (exact spelling and exact casing). For instance, if you named the file eyes.GIF, but you are calling it eyes.gif when you try to reference it from a webpage or your browser, then it will not be found because Unix is case-sensitive for file and directory names (that is, it sees names that differ only by upper or lower case as being different). Similarly, if you created a subdirectory named "images" but reference it as "Images" or "image", then your browser will not find it nor any of the files in it and you will see broken image icons.
If you have a digital camera you probably have software that will let you save them to your computer. Ideally, you will have software that will let you save such photographic images as JPEG files and perhaps let you edit the images as well. The most useful features for editing photos that will be seen on the web are: